Thursday, August 1, 2013

Baby Shower Cake


Continuing my last post, I made a cake for the baby shower as well! I was a little worried about this one, but it wasn't as bad as I thought it would be. Again I stated by making the cake which I decided to make 2 layers(I find 1 in the Wilton cake pans seem small). I mixed all the different colours again for the multi coloured look, cooled them, and went to town.

I started with the plain white flat icing areas(handle and wheels), then mixed the different colours of icing.  I needed to make 2 batches of icing due to the 2 layers.  

Once I was satisfied with those areas, I moved on to the buggy visor(sun shade). I chose pink and purple since the baby is a girl. 

I did the wheels next in purple and pink to match the visor. Then I did the carriage in yellow with round silver sprinkles for accents. (To be honest in hindsight, I wish I had chosen pink and white, and done the carriage itself purple, but it turned out pretty regardless). I  happy to say that Mommy-to-be was surprised and loved it! 


Monday, July 22, 2013

Baby shower cupcakes


I made some cupcakes for a friend for her baby shower(same one as the diaper cake and cake).  She loves my rainbow cakes for I made up a batch mixing in all the colours she liked in my list.  

Since she is having a girl chose to do the icing in pink and white.  I took a piece of cardboard and placed it into the icing bag, and filled one side with pink icing, and the other with white icing.  Then with help from my fabulous husband, I carefully(with cursing) pulled out the piece of cardboard and iced the cake with the 2D Wilton tip. It gives it the dual coloured swirl look, since I didn't want plain pink.  Topped them with small pearl sprinkles and some fabulous toppers i found and The Dollar Tree and they were done! They were a big hit! 


Baby shower diaper cake


One of my closest friends is expecting her first baby and I am super excited!! She is having a girl(supposedly) and I want to spoil her and her mommy(daddy too by extension). I love making things, so I decided to make her a diaper cake, cupcakes, and a cake for her shower. Diaper cakes are time consuming, and the diaper rolling can be mind numbing and boring, but the presentation is awesome. I found some little things to glue on at the Dollar Store, and Babies R Us and went at it. 

I started by rolling and entire box containing 108 of size 1 Pampers diapers and wrapping an elastic around each one(Sorry Sophie, they are a pain to get off when you need them!!). Then I placed all the diapers in each tier and wrapped it with a larger elastic to hold them in place.  Once they were stacked, I placed chop sticks through all 3 tiers to hold the cake together.  I dug out my hot glue gun and began glueing the ribbon around each tier, double wrapping the second tier for more of a cute effect. 

I then glued on each item I had purchased, not including the ice pack and soothers, for fear they might melt). I did not like the ducky on top as it didn't really match, so an Instagram mommy suggested a poof for the bath, and it looked MUCH better! I wrapped it up with clear wrap and tied a cute bow and VOILA! I LOVE how it turned out! It's a really easy and inexpensive way of presenting a gift of diapers rather than just giving the box! And everyone knows you always need the travel size shampoos and moisturizers and ice packs! 


Wednesday, May 29, 2013

Citronella candles

I love making things with mason jars, infact I seem to be searching all the time for things to make with them.  My latest crafting experiment was to make citronella candles! The bugs where I am are terrible, so I wanted to make some for the backyard so we can spend more time outside at night. It took me awhile to find everything I needed since it was not yet "canning season" to get all the supplies.  I found the citronella oil at the local natural food store, I already had the mason jars, and a friend gave me some wax.  
To colour the mason jars I mixed modge podge and some Wilton food colouring, since it seems to be the best and most concentrated food colouring.  I then painted the mixture onto each mason jar, as many coats as I felt necessary until I got the desired colours. I then cured them in the oven at 200 degrees for 1 hour.(I think my next batch will be at 325 for at least an hour if not more as a friend left hers outside and it crackled a little.) I then left them for a week to get them as cured as possible. I heated 1 pound of wax per 2 candles, and added 1/2 an ounce of citronella oil. Once it wax fully mixed and melted I filled the mason jars 1/2 way, and placed a ready made wick in the middle of the mason jar.  I let them cool for 72 hours and we were able to use them one evening when we had a "campfire" at the neighbours. I love them and I am looking forward to making more! They smell delicious and they work wonderfully! We were not swatting at any bugs for the whole time we were outside!!

Monday, April 8, 2013

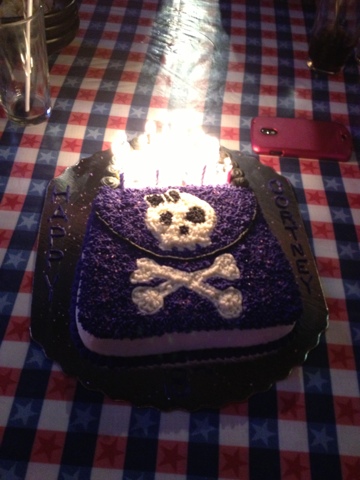
Cake: skull and crossbones purse

It was my neighbours 18th birthday yesterday and I was very excited to make a cake for her. She's a girly girl with a twist...she loves just about anything with skulls. Last year I made her Jack Skeleton cupcakes that turned out super awesome, and I was afraid that it would be hard to top. I made her mom come with me to bulk barn to pick a cake pan. She decided on the purse cake, but we had to modify it since a pink cake with a flower is really not her style. Her mom though a deep purple with some type of skull on it would knock her socks off, and really I had creative control. So this is what I came up with! Special thanks goes to my hubby for his artistic talent at drawing the skull. I can paint by numbers and follow a pattern, but that was a little outside my expertise! We make a fabulous team!


Sunday, March 10, 2013

Hawaiian theme nails

It was girls night in Friday and it was a Hawaiian theme, so what was I to do other than figure out a nail concept that would fit! Low and behold I googled Hawaiian nails and learned how to do some pretty neat flowers, and this is what I came up with! I painted the base coat purple and let it dry completely. Then I took my home made tool, I pictured and explained in my polka dot blog, and made 5 connected dots in different colours on each nail. I let it dry until it was tacky, then took a toothpick and made a line on each petal from the outside in. Once it was dry I put a centre dot on each, and put on a finishing coat. It took a few hours, because I wanted to wait until each application was fully dry, but I love how they turned out, and so did the girls!

Monday, February 25, 2013

Mickey Mouse nails

I have been looking forward to doing these ones! I saw them and fell in love, Disney nut that I am. I am also LOVING that Walmart sells the NYC nail polish for 2 for $3! How can you go wrong?! Although I know I am going to have to give my nails a break sooner or later as they are starting to show the signs that they are too dry and too stripped! But not yet. I think I just found my new favourite nail design!! So glad I made the home made dot tool because it made it so easy!!! Hope you like them as much as I do!!

Friday, February 22, 2013

Balloon nails

These did not turn out exactly how I was hoping, but they are still fun. I had also applied baby oil to my nails just before to get them moisturized and I think that affected the nail polish. Anyways, I will try again in the future, maybe when I get better brushes for cleaner lines!

Monday, February 11, 2013

Classy polka dot nails

Over the weekend I had my nails plain and the felt sooo boring, so I went searching for something a little more grown up. I found a few different options, and decided to do polka dots today. I had seen online all the nifty tools you can buy for perfect looking shapes, but there is NO way I am willing to spend what they go for. I then stumbled upon a few pictures of home made tools and decided to see if they really work....THEY DO!! So don't waste your money! Make your own too!!


Wednesday, February 6, 2013

Senators nails-showing my SENS pride!

So I was not going to do my nails for the game...I think my nails may need some rest and healing, however a friend seemed excited for me to do them, so I did. I did them once, and did not like them, so I redid them. I am glad I did as I am a proud SENS fan and it felt good to be decked out for the game. I will post what I did first as well. I hope you like them too!!


Friday, February 1, 2013

Leopard print nails!

Well, seeing as my last nails only lasted 3 days, I needed to do them again! I have been wanting to try these leopard print nails for awhile, but I have been apprehensive about the white base, and I didn't have enough colours for my liking. Today I figured why not? It's easy enough to remove! I am super happy with how they turned out, and I can't wait to go shopping again with my niece to get more of the design nail polish brushes(she knows the cheap places!). Hope you like them!!


Tuesday, January 29, 2013

Geometric nail fun

Pinterest has struck again. I needed to redo my nails and I figured I would try something fun rather than just plain colours. I had seen this on Pinterest a while ago but I was lacking the black to try it. It was really easy, just time consuming. Paint a couple coats of the base colours(however many you want to try). Let dry, then add your tape(I used what I got in a French manicure set). Once those are stuck on the paint over your whole nail with black. Once it's dry, carefully peel off the tape and paint with a top coat to make it shiny! Now I just need a better top coat. I am also shaky so I tried cleaning the polish as best I could, so pardon the mess! Hope you like it and possibly gives you some inspiration to try something fun yourself!


Monday, January 28, 2013

Pinterest bath time fun

I, like many MANY others, am obsessed with Pinterest! I don't plan on doing a weekly challenge, as I have a few friends blogging about that so I don't want to copy them or try to " steal their thunder". Plus, I have enough challenges going on right now, but I will blog about the ones I find super fun and super easy! There I tried a couple in one last night for my sons bath time. We did coloured water and glow sticks. I had previously purchased water dye tablets for kids, and already had glow sticks from previous celebrations, so I decided why not combine them and have a super fun bath. We had blue water and I added 7 glow sticks. He was so excited and really loved it when I turned off the lights! It was a really fun and really cheap thing to do for him, and something we will do more often!


Saturday, January 5, 2013

Elf on the Shelf ideas

This year one of Santa's famous elves made their way to our house. We prepared Xander by watching the movie and reading the book. But it wasn't until the next morning when he saw that the elf had arrived that he really grasped it. He never got the "behave as the elf will tell Santa everything" concept, but he's 2, so I wasn't expecting him to. I just wanted to get him excited about Christmas. We also have yet to come up with a name for the elf as I want him to name it, and he doesn't get that concept yet either, next year. I wanted to do some fun and creative poses, which but the end of it gets hard trying to top yourself! I got some from other elf idea blog posts, stole ideas from friends(Delia in particular!), but for the most part they were my ideas. Some are plain and simple(forgot to move him and had to scramble last minute), and some I am rather proud of! I also made my mother do it when she had him. So here are pictures of our elf adventures!